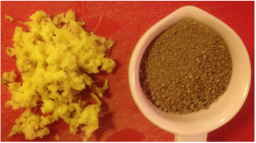
 Ginger and cane sugar
 We ordered organic ginger to make our own ginger liqueur, as most of the commercially available products contained preservatives, additives or worse. As we only needed 2 oz of the root and I had set my sights on making sodas for the past few weeks, I decided to use the rest of it to make ginger ale.
I've been reading this wonderful book The Art of Fermentation: An In-Depth Exploration of Essential Concepts and Processes from around the World by Sandor Ellix Katz, which contains a very simple recipe for ginger ale/beer. The main difference with most other recipes is that this one uses naturally occurring yeasts from the ginger as opposed to using dry yeast. The important part here is that you have to get organic (USDA) ginger. Non-organic ginger is irradiated, which kills the yeasts. This also means that it takes a little longer to actually make the ginger ale as you need at least several days to create a 'ginger bug'.
A ginger bug is basically a fermentation starter and is very easy to make:
Ingredients
Instructions
Grate about 2 tablespoons of ginger with the peel on in a small jar. Add 2 tablespoons of filtered water and a tablespoon of sugar. Mix well and cover the jar loosely, while keeping it in warm place out of direct sunlight. I covered a mason jar with some cheesecloth:
I've been reading this wonderful book The Art of Fermentation: An In-Depth Exploration of Essential Concepts and Processes from around the World by Sandor Ellix Katz, which contains a very simple recipe for ginger ale/beer. The main difference with most other recipes is that this one uses naturally occurring yeasts from the ginger as opposed to using dry yeast. The important part here is that you have to get organic (USDA) ginger. Non-organic ginger is irradiated, which kills the yeasts. This also means that it takes a little longer to actually make the ginger ale as you need at least several days to create a 'ginger bug'.
A ginger bug is basically a fermentation starter and is very easy to make:
Ingredients
- Fresh, organic ginger
- Whole unrefined cane sugar
Instructions
Grate about 2 tablespoons of ginger with the peel on in a small jar. Add 2 tablespoons of filtered water and a tablespoon of sugar. Mix well and cover the jar loosely, while keeping it in warm place out of direct sunlight. I covered a mason jar with some cheesecloth:
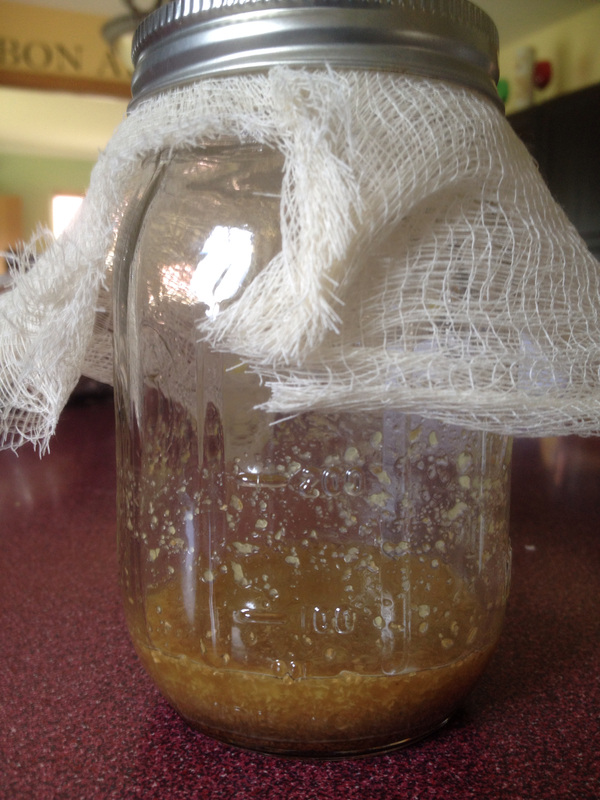 The creation of a bug: start of the ginger yeast culture | 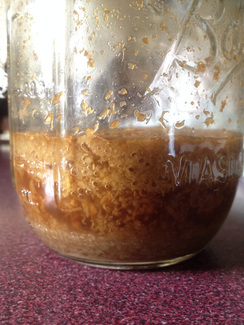 It's alive! The ginger bug after 5 days. |
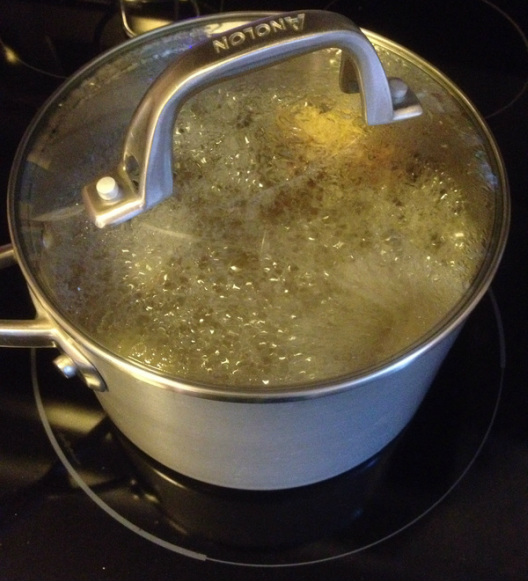 The ginger concoction, ready to simmer for the next 15 minutes.
 For the next 5 days or so, keep adding ginger, water and sugar (about 1 tablespoon of each). The mixture should start bubbling and foaming (mine did so vigorously). After the ginger bug works for a week, use it up or put it in the fridge. You can keep it alive by feeding it the same mixture (1 tb ginger, water and sugar each) once per week.
Time for beer!
Now it's time to prepare the actual ginger decoction that will become the ginger beer. Fill a cooking pot with water, half the volume of ginger beer you want to make. So if you want to make 1 gallon (3.8 l) of ginger beer, add half a gallon of water in the pot. Add finely sliced or grated ginger, about 2-6 inches (5-15 cm) of ginger root for each gallon of ginger beer. I used about 4 inches (10 cm). Bring this to a boil and then gently simmer, covered, for about 15 minutes.
The amount of ginger will of course directly influence the flavor. So for a stronger ginger ale, add more ginger. As with mostly anything in cooking, it's easier to keep adding than to remove something. So start with a lower quantity and taste after the 15 minute boil. If you want a stronger flavor, add more ginger root and boil another 15 minutes. The only way to reduce the flavor would be to dilute it with more water.
At flameout (i.e. when you're no longer directly heating the pot) add sugar at a rate of about 2 cups per gallon of target volume. This was the author's suggestion and he even mentioned that he was conservative. Many others would like it sweeter. Given that we have substantially reduced our sugar intake, 2 cups per gallon is still too much. I'm going to try it with 1 cup next time. I felt as though 2 cups was too much, but it was hard to estimate the flavor with only half the volume in the pot.
Once the sugar is dissolved go ahead and strain the liquid into a fermentation vessel, discarding the ginger. Add the other half of filtered water now, bringing the volume up to the desired target (and simultaneously cooling it down). Ensure that the mixed liquid is no hotter than 85-90 F (29-32 C) and add the ginger bug. Anything hotter than this range would kill the yeasts from the ginger bug. Feel free to add some lemon juice as well. Put an airlock on the fermentation vessel. Play a game of Pandemic while you wait for the ginger beer to cool down.
Depending on how alcoholic you want the ginger beer to be, keep an eye on the fermentation. Once the beer is bubbly, it's ready to be bottled with a minimal amount of alcohol (completely safe for children to drink - we're talking trace amounts of alcohol here). If you desire a more adult beverage, let it ferment for several days.
WARNING Live ammunition!
Now comes the critical part that requires a lot of attention. This is true for any bottled, carbonated beverage, but especially so for sodas and pops. Bottle the ginger beer with at least one of the bottles being plastic or flip top so you can easily check the level of carbonation. Once the bottles are capped, keep them in a temperature steady environment out of direct sunlight. Gauge the carbonation by squeezing the plastic bottle or opening the flip top. The advantage with plastic bottles is that you don't have to open them, thus keeping the carbonation intact. If the plastic bottle doesn't yield much anymore, it's ready and the bottles should be put immediately into the refrigerator. As the fermentation will continue even in the fridge (and thus the pressurization), drink the ginger beer within a few weeks!
The danger lies in having over-pressurized bottles, which could literally explode. At a minimum that means you'll have to clean up a mess, but if you're working with glass bottles it could also lead to injuries. So be careful! With beer, wine and mead we wait until the fermentation is over before bottling. Technically the same could be done with ginger beer or other sodas/pops, but obviously it will no longer be kid-friendly as it will have an actual measurable alcohol content. So be careful who your target audience is!
I'll update once the fermentation starts in the jug and then once the bottling is ready.
 RSS Feed
